
Appearance
Configure the label editor
Once you have created a dataset, you can further configure the labeling interface under Settings -> Labeling -> Categories:
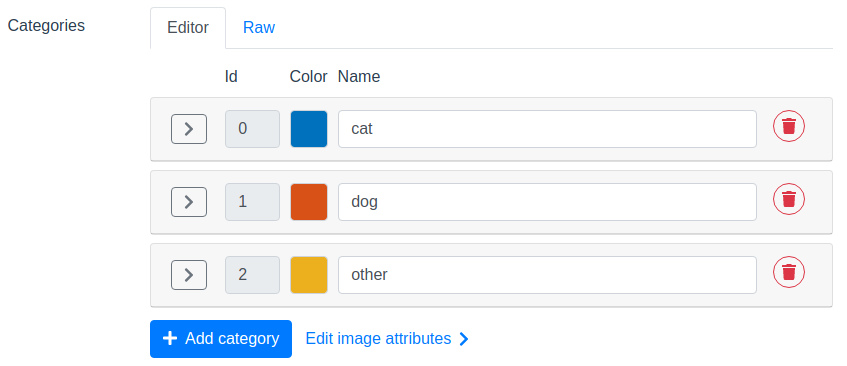
Here you can set the color, name, and description for each category.
Keyframe interpolation and extrapolation
For sequence datasets, open Settings → Labeling to configure how labels are calculated across frames:
- Enable keyframe interpolation: Automatically calculates intermediate values between keyframes for 2D bounding boxes and 3D cuboids.
- Enable keyframe extrapolation: Predicts 3D cuboid positions after the last keyframe using the motion defined by the last two keyframes. This is disabled by default and does not extrapolate rotation, dimensions, or attributes.
- Use timestamps for interpolation and extrapolation: Uses frame timestamps instead of frame indices to calculate motion.
Changing the extrapolation setting requires confirmation and can affect existing labels. Review affected sequences after saving the change.
See Use keyframe interpolation and extrapolation for the workflow and limitations.
Working with attributes
Object attributes
You can add one or more object-level attributes or object attributes to a category by expanding its row.
Attributes come in 4 types:
- Select box
- Multi-select box
- Checkbox
- Text
- Number
You can optionally configure following settings for each object attribute:
- Default value: default value of the attribute.
- Mandatory: whether the attribute is mandatory. Mandatory attributes raise a warning when not filled in.
- Synced across frames ("Sequence-level"): Only in sequence datasets. Whether an attribute should remain constant across all frames for an object with a certain track ID. If false, the attribute can change on each frame.
- Synced across sensors ("Across sensors"): Only in multi-sensor datasets. Whether an attribute should remain constant across all sensors for an object with a certain track ID. If false, the attribute can change on each sensor.
- Sensors: Only in multi-sensor datasets. Whether an attribute applies to 2D sensors, 3D sensors, or all sensors.
Checkbox default values
Checkbox attributes support three possible default values:
- Checked (
true) — the checkbox is on by default - Unchecked (
false) — the checkbox is off by default - Unset (no default) — the checkbox has no value until the labeler explicitly sets it
When a checkbox attribute is mandatory and its value is unset, a warning will be raised — just like other mandatory attributes that are left empty. This is useful when you want labelers to make a deliberate choice rather than relying on a pre-filled default.
When no default is configured, the checkbox appears in a neutral "unset" state. The labeler can click the left half to set it to unchecked, or the right half to set it to checked.
Reserved object attributes (preset attributes)
Preset attributes are predefined object attributes with dedicated visualization behavior. The category editor calls them Preset attributes. The available presets describe lane line shape (type), color, and width (thickness).
To add them to a category:
- Open Settings → Labeling → Categories and expand the category.
- Under User-defined attributes, open the dropdown beside Add attribute and choose Add preset attribute.
- Select the presets to add. You can change their attribute names before adding them.
- Click Add, then save the dataset configuration. Presets already added to the category are marked Already added; edit or remove them in the attributes table.
| Preset | Default attribute name | Predefined values | Default value |
|---|---|---|---|
| Line shape | line_shape | solid, dashed, solid dashed, double dashed | solid |
| Line color | line_color | yellow, white | white |
| Line width | line_width | thin, wide | thin |
In the 3D vector interface, open the settings sidebar and enable Layout → Apply preset attribute visualization. This switch appears when lane marking attributes are configured. Select a polyline and set its preset attribute values in the labeling sidebar to display the corresponding lane marking style.
You can rename presets and adjust their values after adding them. The special input type controls visualization; an ordinary select attribute with the same name does not enable it. Custom values without a corresponding visualization use the preset's default visual style, and the category editor shows a warning.
New presets are synced across frames in sequence datasets and across sensors in multi-sensor datasets by default. You can adjust these settings in the attributes table.
For the JSON input types, see Preset object attributes.
Scene attributes
You can add scene attributes by clicking the "Edit image attributes" button. Scene attributes are not linked to a specific object, but rather to a frame or the scene as a whole.
In the labeling interface
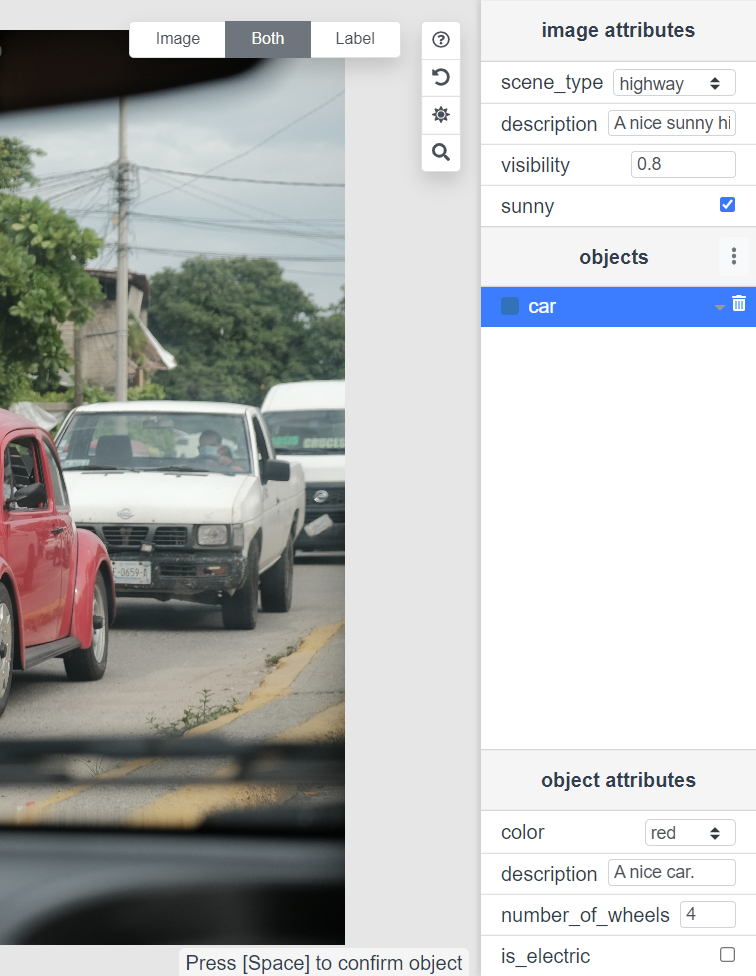
When labeling, the object and scene attributes will be shown in the sidebar on the right. Scene attributes are always visible, while object attributes are only shown when an object is selected which has a category with object attributes.
Timeline display (sequences only)
For sequence datasets, user-defined attributes also appear in the timeline interface at the bottom of the editor, allowing you to view and edit them directly while navigating through frames.
How attributes appear in the timeline
The timeline displays attributes differently based on whether they have a category:
Track attributes (attributes with a category):
- Visible when you select a track in the viewer
- Display as rows below the track row in the timeline
- Each row shows the attribute values across frames
Scene attributes (attributes without a category):
- Visible when you select "Scene attributes" from the View dropdown (when no track is selected)
- Display as rows at the top of the timeline
Attribute behavior in timeline
Attributes can be configured along two independent dimensions:
Dimension 1: Frame-level vs Sequence-level (Synced across frames setting)
- Frame-level (Synced across frames = disabled): Each frame can have a different value. The timeline displays one cell per frame that you can edit individually.
- Sequence-level (Synced across frames = enabled): One value applies to all frames. The timeline displays a single value that applies to the entire sequence.
Dimension 2: Sensor-specific vs Synced across sensors
- Sensor-specific: Each sensor can have different values. In multi-sensor sequences, each sensor's timeline shows its own attribute values.
- Synced across sensors: The same value applies to all sensors. All sensors share the same attribute value.
Possible combinations:
These two dimensions create four possible configurations:
- Frame-level + Sensor-specific: Each frame and each sensor has its own value
- Frame-level + Synced across sensors: Each frame has its own value, but all sensors share the same values
- Sequence-level + Sensor-specific: One value per sensor for the entire sequence
- Sequence-level + Synced across sensors: One value for the entire sequence across all sensors
Benefits of timeline editing
- Edit attribute values without switching between panels
- See how attribute values change across frames at a glance
- Quickly identify frames where specific attribute values are set
- For frame-level attributes, easily compare values across multiple frames
For detailed instructions on editing attributes in the timeline, see Track timeline - Edit attributes.
Editing the configuration file directly
If you click on the "Raw" tab, you can see the configuration in JSON format. You can copy-paste this configuration from one dataset to another, or update it programmatically using the Python SDK. The configuration should adhere to the format defined here.